If you want to create a website that displays your content in an organised and attractive way, you might need a grid plugin. A grid plugin is a tool that allows you to create different types of layouts for your posts, pages, products, or any other type of content on your WordPress site. Grid plugins can help you showcase your content in a way that suits your purpose and style, without having to code or design anything yourself.
WordPress is a powerful and flexible content management system (CMS) that lets you create and manage your content easily. However, WordPress does not have a built-in feature to create grids or lists of your content. You can use themes or page builders to create some basic layouts, but they might not offer the level of customisation and functionality that you need. That’s where grid plugins come in handy.
A grid plugin can help you create dynamic and responsive grids that adapt to different screen sizes and devices. You can choose from different types of grids, such as masonry, carousel, slider, portfolio, gallery, or blog. You can also customise the appearance and behaviour of your grids, such as the number of columns, rows, spacing, pagination, filters, sorting, animations, and more.
One of the main benefits of using a grid plugin is that it supports content abstraction. This means that you can display a summary or an excerpt of your content on the grid, and then allow the user to click on it to see more details. This way, you can provide a user-friendly interface that lets the user explore your content at their own pace and interest. You can also use grids to display different aspects of your content, such as the title, image, date, author, category, tags, ratings, comments, etc.
Another benefit of using a grid plugin is that it generates the user interface dynamically from your existing content. This means that you don’t have to hard-code or duplicate your content for each grid. You can simply select the source of your content (such as posts, pages, products, custom post types, etc.) and the grid plugin will automatically fetch and display it on the grid. If you update or add new content to your source, the grid will also update accordingly. This way, you can ensure that your grids are always fresh and relevant.
Grid plugins can be used for various purposes in web design. For example, you can use grids to:
- Showcase your portfolio or gallery of images
- Create a blog or news section with different categories and filters
- Display your products or services in an online store
- Highlight your testimonials or reviews from customers
- Create a landing page or a homepage with different sections and elements
Adding a Shortcode
You can insert an Advanced Grid Builder (AGB) anywhere in WordPress where shortcodes are supported.
Standard WordPress
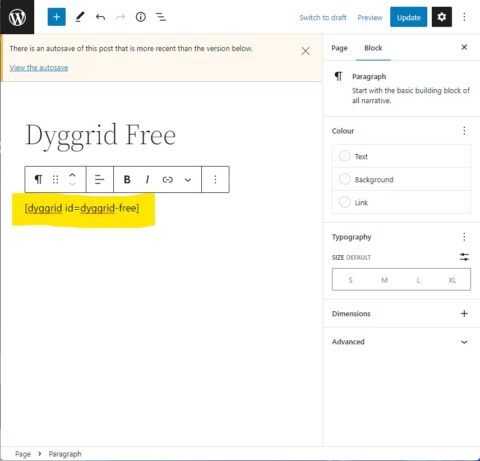
To add an AGB, edit a page or post and add this shortcode anywhere in the content area:
[agb id='any-name']
Replace ‘any-name’ with a unique id for your grid.
You can add as many AGB shortcodes to a page as you like. If they have the same id, they will display the same content, otherwise each will be different.

Back end view
Add your Dyggrid shortcode to the content area when editing pages and posts

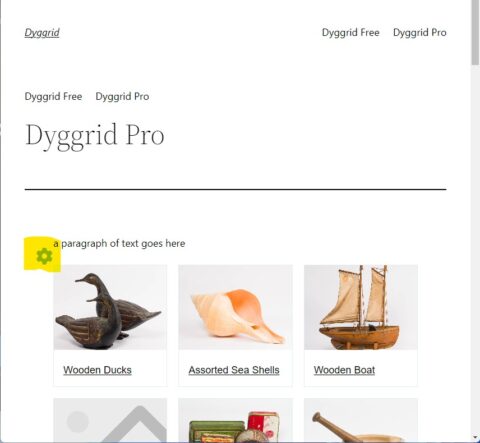
Front end view
When viewing your page, the front end editor shows a blue cog at the top left corner of the grid
Divi Page Builder and Theme
The AGB shortcode can be added to any code or text module. If added with a text module, you can also style your AGB with the module settings.
Elementor
The AGB shortcode can be added with the shortcode widget.
Other Page Builders
AGB will be compatible with all page builders that properly support the inclusion of a shortcode. Check the developers’ documentation for details.
Editing an AGB
All AGB configuration takes place on the front end using our user-friendly front-end editor. Once you add the shortcode, view the page while logged in as an Administrator and look for the blue cog icon on your page where the shortcode was inserted. Please note that this blue cog icon is only visible to users logged in as an Administrator, normal site visitors will not see this.

Look for the blue clog
When first added your grid will default to this basic view with posts as the content source. If there are no posts, the grid will be empty but the blue cog will still be there.
When first inserted, AGB defaults to show your posts. The grid will be empty if you have no posts, so it will not look the same as above.
Click on the blue cog to edit your AGB. Remember, this option is only available when you are logged in as an Administrator.